ADSB.im
Simple to use ADSB Feeder Images
(not
just) for common Single Board Computers
A Quick Start Guide to Setting Up an ADSB Feeder
Introduction
This document is pretty old at this point, but kept here for completeness. I'll try to keep it updated and relevant,
but please look at other resources as well...
This quick-start guide allows you to build a receiver and start seeing what aircraft fly above your
location in no time, and at minimum expense. Each step has “minimum configuration”, and discusses
some ideas on how to make it better at an additional cost or effort.
There are a number of videos on our the adsb.im YouTube channel that
should also help you get started.
Hardware
For a minimal configuration you need:

- A small single board computer (“SBC”): see the list of currently supported boards; if price is a concern, the OrangePi Zero 3 is a good choice, otherwise one of the Raspberry Pi 4 boards (1 GB RAM works just fine) is likely the best option.
- A good power supply for your SBC. Most of the recommended boards use use USB-C (Raspberry Pi 4, Orange Pi boards), some others use micro-USB (older Raspberry Pi models, Libre Computer Le Potato, etc) - either way, make sure you use an actual power supply designed for at least 2.5A (or 4A for a Pi 4) and not just a USB charger. Bad power is one of the main reasons for random issues with the boards.
- A (good quality) µSD card of at least 8GB with 32GB or more recommended (given pricing in January 2026, 64GB appears to be about the same price and easier to get than 32GB - so that's the current recommendation). The software is optimized to reduce disk writes, but over time the SBC will write to it enough that a high quality card makes a difference. SanDisk Ultra or Samsung High Endurance appear to be good choices.
- Internet access for your SBC. WiFi is supported on most boards, including all of the Raspberry Pi family; some other SBCs (like the Le Potato seen below) need wired Ethernet.
- An SDR USB stick ("dongle"). Check the list of supported SDRs.
- An antenna for the SDR dongle.
- SBC: Raspberry Pi 4, 1GB RAM with USB-C power supply from PiShop.us (~$55 with shipping)
- Case: Geekworm, passively cooled (~$10 plus Amazon shipping)
- SDR, indoor antenna, SD card: Chinese OEM SDR with 1090 MHz “rubber duck” antenna (~$50 plus Amazon shipping)
- SBC: Orange Pi Zero 3 1GB (~$25 plus Amazon shipping)
- Power supply: CanaKit USB C power supply (~$10 plus Amazon shipping)
- SDR: Chinese OEM SDR direct import (~$25 including shipping)
- Antenna: Chinese basic 1090 MHz antenna (~$6 if shipping with the SDR)
- SD card: SanDisk Ultra 16 GB (~$10 plus Amazon shipping)
You also should have access to a computer (Windows, Mac, Linux) and an µSD card writer. This will be
used for the initial setup; once everything is running, you can access the flight map from your phone
or pretty much any other device.
If you want to upgrade your hardware parts to something better, then consider this:
- A better/faster SBC. This will help with faster processing and it will enable running more things in parallel. For example, a Raspberry Pi 4 (with 2Gb or more memory).
- An enclosure (case) with cooling for your SBC. Cooling is important - things will get hot!
- A better quality SDR dongle, look at the list of supported SDRs (as well as filters / LNAs).
- A better antenna that is mounted outside. For example, ADSBExchange vertical, FlightAware vertical, Radarbox vertical, or an antenna from DPD or Vinnant.
- A larger SD card: 64 Gb or 128 Gb. You won't need the space, but because of the way SD cards work and how Linux writes to them, larger SD cards will have a lot longer usable life than small ones. One odd downside is that the first boot will take a lot longer on a larger card, so be prepared for that extra wait time.
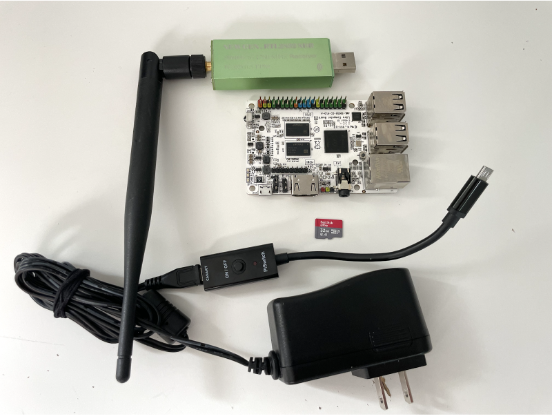
For the rest of this guide we'll show an example based on a fairly cheap and basic setup using
- Libre Computer Le Potato SBC
- CanaKit micro-USB power supply
- SanDisk Ultra 32 Gb SD card
- No-name SDR
- No-name 1090 MHz “rubber duck” antenna
Setup
Step 1: Download and write the ADSB Feeder Image to the SD card
The following steps are all performed using your PC or Mac machine. The images will show how that looks
on a Mac; it’s very similar in Windows:
-
If you're using a Raspberry Pi, the image is available without separate download using the Raspberry Pi Imager mentioned below. Just check the "other special purpose OSs" section in that app.Download the current release for the correct board. In our example we will pick the one for the Libre Computing LePotato.
-
Place the micro-SD into the SD card writer and connect it to the computer. Verify that your computer can “see” the SD card
- Use the Raspberry Pi Imager to write the
image you downloaded earlier to the SD card.
- Click Choose OS. If using the Le Potato board (or another non-Raspberry board)
scroll to the bottom and click Use custom.
Then select the
adsb-feeder….img.xzfile you downloaded in step 1 above. - Back on the initial screen, click Choose Storage and select the SD card you inserted. DOUBLE CHECK THAT YOU SELECTED THE CORRECT VOLUME AS IT WILL BE ERASED/OVERWRITTEN IN THE NEXT STEPS.
- Now click Write and read/follow the subsequent dialog. The image will be written to the µSD card, and it will verify that it was written error-free.
- If all was written correctly, a dialog box will show that you can remove the SD card. Please do so.
- Click Choose OS. If using the Le Potato board (or another non-Raspberry board)
scroll to the bottom and click Use custom.
Then select the
Step 2: Hardware Setup of your SBC
- First place the SD card into the slot of the SBC. Note - for most SBCs, insert the SD card upside down.
- Connect the antenna to the SDR and insert the SDR into any of the open USB slots.
- Finally, connect the power supply to the micro-USB slot and power up your SBC. The LED lights should be on now.
- Wait a few minutes for the SBC to complete it’s initial boot cycle. The larger your µSD, the longer that initial boot cycle will take. Please be patient.
Step 3: software setup of your SBC
- Assuming that you use a wired Ethernet connection, a few minutes after initially powering up your SBC, you should be able to browse to http://adsb-feeder.local (from a different computer - the ADS-B Feeder Image doesn't include a desktop in order to keep the image small). If this doesn’t work, try the external redirector at http://my.adsb.im/. If that fails as well, you will need to determine the local IP address from your home router or whatever device manages your network.
- If you are using WiFi, you'll have to go through the WiFi setup as described on the Hotspot page.
- Use this web-UI to configure your ADSB Feeder.
- Give it a name (used for MLAT graphs).
- Enter the physical location of the antenna (there is a link to a useful tool if you need help finding the correct latitude, longitude, and elevation).
- Enter the time zone (again, there's a button to make this straight forward).
- Select that you want to feed ADS-B data.
- Click on Setup - if you have a simple setup as depicted above, you should now get forwarded to a page where you can decide which aggregators to feed. Once you apply those settings, you'll be forwarded to the main home page of your ADSB Feeder.